Saturday, November 12, 2011

I'm Back, Finally!! With A Tutorial Even!

Wow, not having a computer is rough, but I finally have my power cord back, woohoo!!  I could have kissed the delivery man!

You know, the good thing about not having a computer is I got a lot more sewing done.  I get distracted easily by blogs, email, facebook, and Pinterest.  I can go looking for one thing and before you know it an hour has gone by! How does that happen?  It's like a time warp because I can tell you one hour in a car with two kids does not go by that fast!

Anyway, I have been cranking out projects for The Kilgoris Project and I am making a bunch of totes with handles.  Turning all those handles was a big pain, so I came up with an easy way and I will share it with y'all here!  Do you have any idea how excited I was to figure out that turning handles could make the switch from being the bane of my existence to a 30 second quick fix!

So I am pleased to bring you the Easy Inside Out Tutorial.

Supplies:
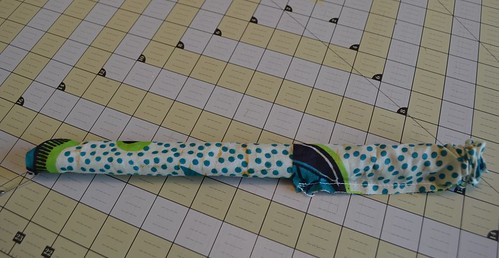
Your inside out handle
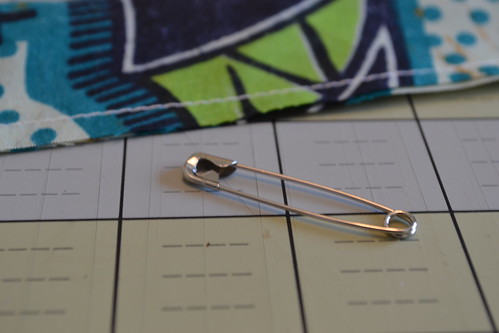
A safety pin, the bigger the better (Seriously, that's all you need!)
DSC_0481

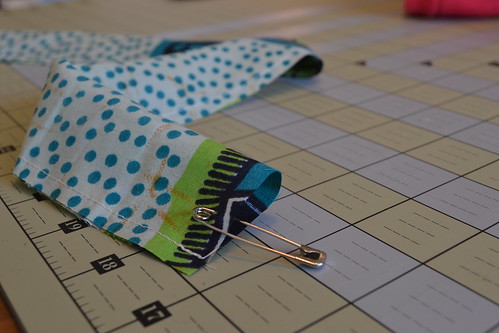
Stick your pin through one side of either end of your handle.
DSC_0482

Now stick your pin inside the tube and scrunch up your fabric all the way onto your pin until you can grab the pin on the other side.  So, your pin went all the way through your tube and is coming out the other end.
DSC_0484

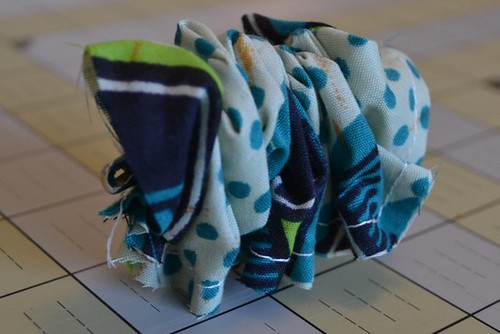
Go to the end of your scrunched up part and start pulling the fabric over onto itself while you keep hold of your pin.  (You do not want to see close up pictures of my hands, so I didn't practice what I preach here)
DSC_0486

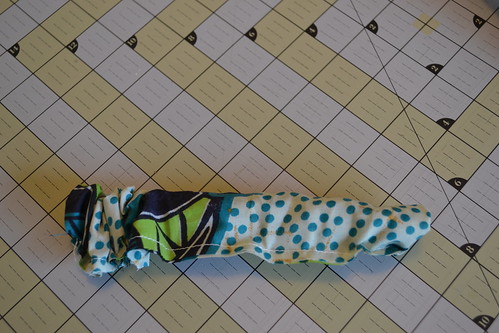
Once you get a little bit pulled onto itself the rest slides easily and quickly.
DSC_0487

Now just take out your pin and press!
DSC_0491

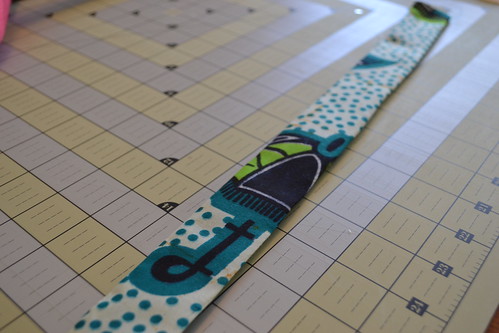
Voila, you have a handle!!  And I could have turned my entire pile of handles in the time it took to write this tutorial.

If you have any questions or anything wasn't clear just let me know!

Monday, November 7, 2011

Friday, November 4, 2011

Sewing For Africa

I have two more weeks to finish sewing projects to donate to sell at the Kilgoris Marketplace to benefit The Kilgoris Project.  TKP is an amazing program that is totally transforming the lives of a community of people living in Kilgoris, Kenya.

My friend from church is one of the major players in this organization and a few months ago she asked if I would sew some things to donate.  She had at least 5 rubbermaid bins of fabric that people had donated to her and a bunch from Africa directly.  I filled up one bin with a bunch of fabric and I have been busy sewing ever since.  I made a bunch of random stuff until I finally figured out what the majority would be.  It turns out that fabric cards are fabulously cute, so I have a ton of those.  Then I made these adorable journal covers too, which I don't have any pictures of yet, oops!

Here are some of the cards I finished this week!

Love these, Amy Butler fabric!
Fabric Greeting Card
Christmas Cards
African Fabric Cards
Fabric Greeting Cards
Fabric Greeting Card

I hope the people who come to shop think they are as cute as I do!! If you are near the Charlotte, NC region and want to check out our local artists please come to the Marketplace. It is going to be November 18th and 19th at Kadi Fit in Cornelius.

I am linking up to Sew and Tell Fridays for the first time today!!


Thursday, November 3, 2011

Charity Quilt Blocks

For our first CMQG project, we received fabric from Jay McCarroll's line from Free Spirit.  This was our first guild challenge and we decided to each make two blocks with the fabric we received and then build one or two quilts to donate.  Here are my quilt blocks.

DSC_1077

DSC_1076

Once the quilts are pieced together and quilted I will show off the finished product!!

Our quilt guild is having a sew-in on Saturday and I'm so excited! Four hours of uninterrupted sewing sounds like heaven!!

Saturday, October 29, 2011

Is Quilting Therapeutic?

Pinterest via houzz.com
For me, most of the time, it gives me a bit of tranquility in an otherwise hectic day.  The optimal place for me is laying in the above hammock in a beautiful tropical location.  But, since that only happens once a year (if I'm lucky, and it's only an Atlantic Ocean beach) I have to settle on finding tranquility in the everyday moments.  Sewing can do that for me.  Maybe that sounds crazy to some, but being able to create amazing things out of scraps of fabric really is like therapy. 

Does anyone else feel that way? 

Friday, October 28, 2011

Hyperdrive

When my son said he wanted a Star Wars quilt two thoughts went through my head.

First, "OMG he's getting super addicted to Star Wars and he's only 5!" (Of course I didn't really need to get worried about him being 5 because now my 3 year old is super addicted to Star Wars because of his brother).

Second, "This could be fun, hmmm, what can I pull out of Star Wars that would make an awesome quilt."

At the same time, the Modern Quilt Guild was having one of their project modern challenges and it was to use all solids.

What popped into my head was this:

So, I started drafting some ideas (I prefer pen and paper) and came up with a starburst sketch with a circle in the middle like a black hole.  I had not made very many quilts at the time and it seemed so way out of my skill level, but I figured I would give it a shot.

Here is how it turned out:

I really can't believe I figured out how to do this on my own, I still consider myself a beginner!  I let Little Man pick out the binding since it was his quilt and he chose this cool sparkly star binding.
You can also see my stippled border. In the middle I quilted a spiral and for the rest I just quilted a starburst pattern starting from the center to give that extra feel of speed.

Since I had a bunch of blue scraps sitting around after cutting out all the pieces, I decided to try an improv pieced back.  I like how it turned out, but the front is my fave!

I didn't actually get it done in time to enter the solids challenge, but this quilt is totally loved on by my Star Wars loving boy.  That's what really matters anyway!

Wednesday, October 26, 2011

Celebrate Color

Have you heard about this fantastic fall contest going on at Stitched in Color


It's called Celebrate Color and it's only being held during the months of September, October, and November.  The idea is to make something fantastic in fall colors and you have a chance to win some fabulous prizes!  Since I have had this partially made quilt sitting around for at least 2 years, I thought this would be the kick in the pants I needed to get it done.  So, I entered the Home Decor part of the contest with this quilt. 

I'm going with the name Wonky Fall.  Although after all the trouble it's given me I should name it Beautiful Disaster!  I had the wonky squares on the outside border finished and all the pieces cut to make more.  But, since this has been sitting around for so long I ended up using the tan fabric for other projects and was left with the little strips of Acadia fabric. (Which I don't even think Moda sells anymore)  Oops!  So, I had to figure out what I was going to do.  What you see is what I figured out and I do love how it turned out. 

Every part of this quilt was a struggle, but I am still in love with it.  I am actually keeping this one to snuggle with.  All of my other quilts have gone to my kids, charity, or given as gifts.  And I love doing all of that stuff, but I thought it was high time I actually kept one!


One of the struggles with this quilt was the backing.  The entire time I was making it, I could not decide if I liked the backing I chose or not.  I loved the fabric itself, I just couldn't decide if it actually matched.  Now that it's finished, I have decided that I do love it together.  The fabric is by Amy Butler, called Midwest Modern Optic Blossom.


For the quilting I free motioned a swirl pattern because I wanted the feel of a blustery fall day!

With all of the struggles this quilt gave me, I actually did learn a new way to handstitch the binding on and it's fantastic!!  You can't see the stitches at all, they are completely hidden.  But, I suppose that's another post altogether.

Sunday, October 23, 2011

Quilting - 6 Year Old Style

My boys are always excited to help me with the sewing machine and quilting stuff.  I let them push the pedal (which they love because they are boys) to fill up my bobbins.  Sometimes I let them stick pins back in the pin cushion, but that only happens if they are in a calm mood!  They just love to hang around and see what I will let them do.  Yesterday, Little Man wanted to quilt.  So, I gave him a bunch of scraps and let him make a "quilt" on construction paper. 

Quilt Dad inspires me to let my boys go ahead and be creative with fabric.  He had so much fun with it, maybe he will be a future improv piecer!

Saturday, October 22, 2011

Modern Quilt Guild

Have you heard of the Modern Quilt Guild?

If not, go look them up.  You may even be able to find a branch near you.  I am one of the lucky ones.  Jennifer, from Ellison Lane Quilts, founded the Charlotte Modern Quilt Guild and it is so wonderful.  If you are in the area and want to meet some lovely ladies please join us at our next meeting on October 27th at 6:00pm at the Morrison Regional Library.  If you're not in the area, check out the list of locations on the modern quilt guild website.  It's a wonderful way to meet quilter's in your area who are doing new and exciting things in the world of quilting!

Thursday, October 20, 2011

Let's Get Pinning

If you're addicted like me you know exactly what I'm talking about just from the title!  If you have no idea that pinning is not just for fabric players, check out Pinterest.  It's an amazing online pinboard of all of your favorite images collected onto different boards.  It is the perfect inspiration center.  Here is my board called The One With Quilts.  And yes, I am a Friends fanatic!  Follow me if you want, I am craftymama82 on there.  Just take a look!
Pinterest via flickr.com 
Pinterest via crazymomquilts.blogspot.com
Pinterest via flickr.com
When you see a ton of quilts all grouped together in one place you can't help but be inspired!

Wednesday, October 19, 2011

Perfect Points Tutorial


One of the things that drove me absolutely crazy when I first started quilting was not being able to line up my seams perfectly.  I am a self-taught quilter and so I have no idea if this is something most beginners learn right away or not.  But, because it bugged me so much I wanted to help out my fellow beginners with a little tutorial on how to get perfect points every time.  This is my first tutorial so if it doesn't make sense just let me know!  Let's get started.

Materials:
~Pins
~Fabric Pieces

Here is a little sneak peek into my current project.  As you can see there are a ton of seams and they all need to be matched perfectly.  

The very important first step is to press your seams in opposite directions.  As you can see below, the top fabric is pressed to the left and the bottom fabric is pressed to the right.  This allows your seam to nest together.  Nesting makes the next step much easier.

Yes, we have to use pins here, they are a necessary evil.  Pinning takes time, but it is well worth the result.   The best pins to use are the thinnest you can find.  I found mine at my LQS and they are amazing.  They slide so easily through the fabric!  What you are going to do is slide your pin directly through your seams.

 It may take a little finagling to get it through both seams, but it should look like this when you catch both.
 

Then just push the needle back up through both seams to the top.  Stitch right over top of the pin (that's also why it helps to have thin pins).  I usually stitch up as close to the pin as I can and then manually go over the needle just to make sure I don't break a needle.

Press and flip over your finished product to see your perfectly matched points.

I hope that was helpful.  It does take practice to get the pin where you want it, but I promise it's worth the time!  If you have any questions, please ask.

Tuesday, October 18, 2011

Quilting Swaps

I have been quilting for about 2 years now and had never joined an online quilting swap or bee.  They look like so much fun, but I never took the time to find one until the other day.  So, I am happy to say I have joined my first quilting swap and I am so excited!

The one I joined is called the Mini Scrap Basket Block Swap.  It is open to all and it is per quarter.  This first quarter is due January 12 and we are making these gorgeous little blocks.  The tutorial can be found at Film in the Fridge.
Aren't they fantastic?  If you want to join us, head on over and sign up!

Monday, October 17, 2011

Creativity Is Messy

Glue, glitter, paint, beads, fabric, paper. . . I could go on and on with a list of materials crafty people use.  And you know what, it get's messy.  There is no way around it!  When you have an idea and are in the midst of turning your vision into a reality, it just happens.

But I think that it is a lovely mess.

It is the mess of a person using their creativity, letting their ideas produce something real.  That is the beauty of it.


  Do you agree that your crafty mess is really something lovely?